
Every TeachVid resource has its own resource page, which includes things such as printable pdfs, the video transcript, information about the resource, information about the YouTube channel, a link to the video on YouTube, and, at the top of the page, an “Open resource” button which is how you access the interactive resource.

Click on the “Open resource” button to open the interactive resource in a pop-up. On a desktop or laptop screen, it looks like this:
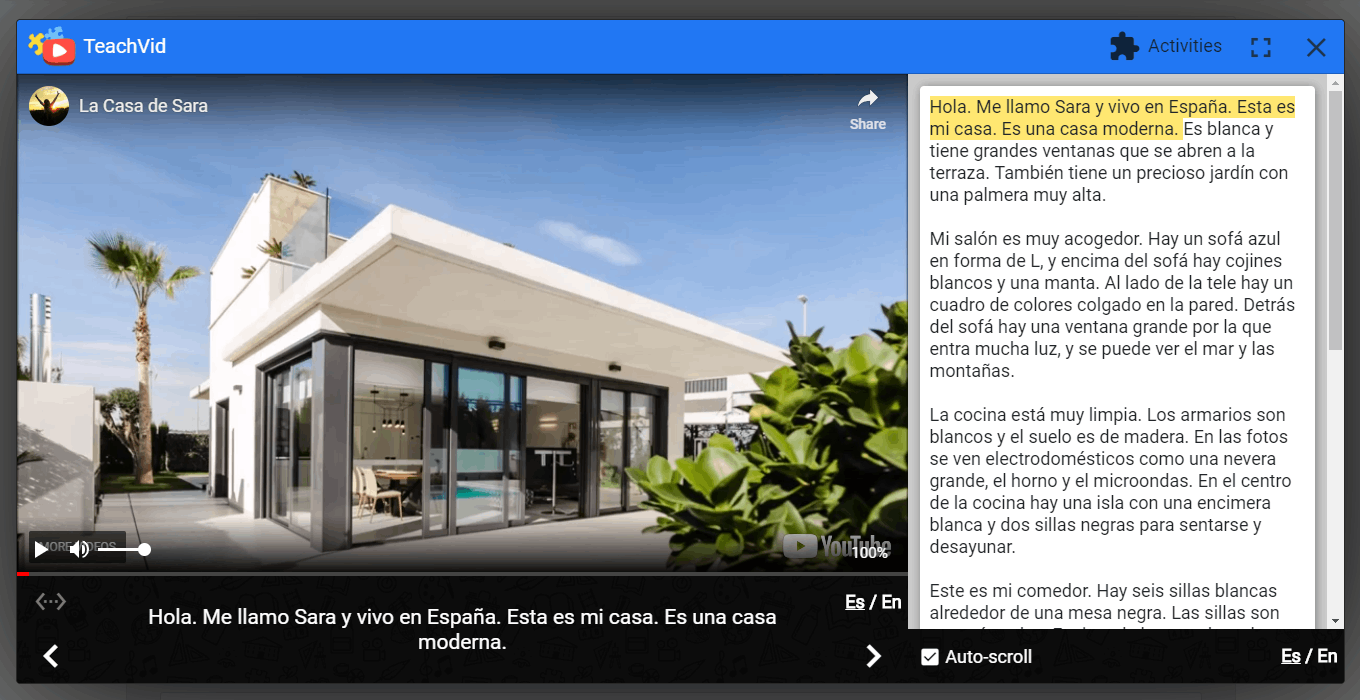
With the resource pop-up open like this, the student is in “learn mode”. Let’s look at some of the key features of learn mode as shown in the image above:
- Bilingual subtitles: these appear beneath the video. Note to the right of the subtitle (in the image above) there is an Es / En button, which currently has Es (Español) underlined. Students can click this to see the current subtitle in their L1 (in this case English).
- Bilingual transcript: this appears to the right of the video (or below it on narrow screens). Note that the current caption is highlighted. At the bottom of the transcript is another language selector. Students can click this to see the whole transcript translated in their L1 (in this case English).
- Auto-scroll: with auto-scroll selected, the transcript / translation will scroll automatically so that the current caption is always visible.
So students can switch between L1 and L2 subtitles beneath the video. They can also switch between a full L2 transcript and a full L1 translation alongside the video, where the specific caption being spoken is highlighted in the text. This allows students to listen to the video whilst comparing the structures and vocabulary used in the two languages.
- Navigation arrows: arrow buttons either side of the subtitle allow students to skip to the previous or next caption. This makes the video skip to the appropriate point in the video.
- Navigation within transcript: similarly, you can click anywhere in the transcript to make the video skip to that section.
So in learn mode, students can view the video as many times as they like, with full control over playback, and they can switch between languages for both the transcript and the subtitles, so it’s really easy for students to, say, view the subtitles in the L2 and the transcript in the L1.
This means that meaning is constantly reinforced, and at all times students can compare and contrast the language used in the video with the translation, whilst at the same time reinforcing the link between how the L2 words are written and what they sound like in the video.
But there’s more…

To the left of the subtitle, above the left navigation arrow, is the Auto-pause button (looks a bit like <···>). When auto-pause is switched on (as in the image above) the video automatically pauses at the end of each caption. This gives the student the chance to:
- stop and study the subtitle
- compare the subtitle with the translation (provided they’ve set them up as in the image above)
- repeat the current caption (note the circular arrow in the bottom right of the video pane)
See how the video screen has been darkened and Spanish and English words super-imposed in the above image? Well, this is what happens when you click the words in the subtitle, when the subtitle is showing the L2 (i.e. the language of the video):
- the video pauses
- the specific chunk or word is displayed along with its “chunk translation”
- the word is read out by text-to-speech (TTS)
At the bottom right of the video pane, you’ll also see the word 100%. Students can click on this to change the playback speed to 75% or 50% (these options will depend on the device the student is using).
Learn mode is a great way for students to notice similarities and differences between their own language and the language that they are learning. They can spend as long as they like on learn mode, stopping and starting, comparing and contrasting, repeating sections, changing the playback speed, clicking on specific chunks for more accurate “chunk translations” (and teacher generated notes for specific chunks where these have been added).
And when they are ready to move on to practise with the language, they can click on the “Activities” button at the top right of the pop-up to access a menu of activities. (And that’s arguably where the learning really begins… See this user guide on Activity Mode in TeachVid.)
Note that students can switch between “learn mode” and “activity mode” as much and as often as they like.
Note also that when you add a resource preview to an assignment, you are giving them the opportunity to engage with the resource in learn mode.
Here’s a link to the resource featured in this post.
For more information about how learn mode fits in with TeachVid’s overall methodology, see our pedagogy page on the TeachVid website.

7 thoughts on ““Learn mode” in TeachVid”