

TeachVid users (anyone who is registered) can create their own resources for any language based on short YouTube videos. Resources can be based on a video-transcript (with optional translation) and / or on a multiple choice quiz.
Follow the step-by-step guide below to find out how to create your own resources on TeachVid using our unique resource creation tools.
My Resources
If you are logged in to TeachVid, you will see a “My resources” tab when you go to the Resources page on TeachVid.

From the “My resources” tab, click on the “Create new resource” button to begin the process of creating a resource.
1: YouTube URL
The first step is to type or paste in a URL from YouTube. Click on the “Open YouTube” button to open YouTube in a new tab (if you haven’t already), then copy the YouTube URL for your chosen video into the text box.
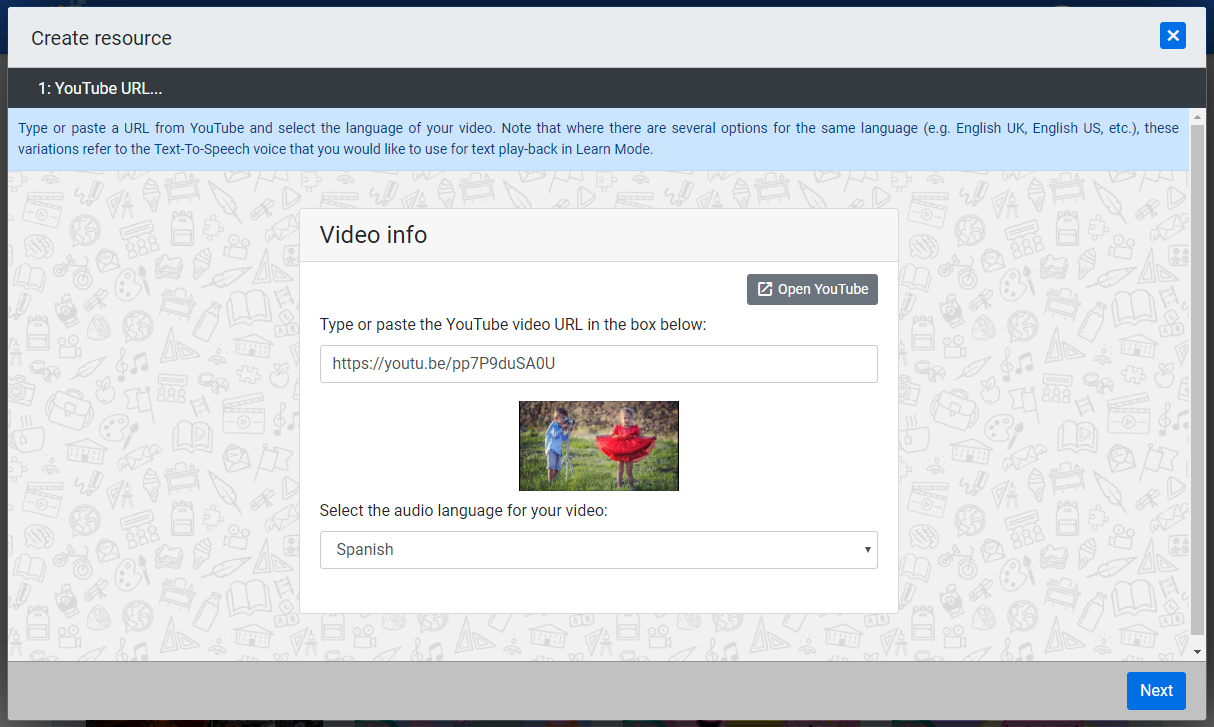
You also need to select the audio language of your video from the available languages. The languages available are: Chinese, Danish, Dutch, English, Finnish, French, German, Greek, Indonesian, Italian, Japanese, Korean, Latin, Norwegian, Polish, Portuguese, Russian, Spanish, Swedish, Welsh.
Note that where there are several options for the same language (e.g. English UK, English US, etc.), these variations refer to the Text-To-Speech voice that you would like to use for text play-back in Learn Mode.
Click on “Next” when you are ready.
2: Video times
At this stage you can decide whether or not to make a resource based on the entire video or just a section of it.

Even relatively short videos – just a couple of minutes long – can actually involve quite a lot of text if you are making a resource based on the video transcript.
One way of exploiting a longer video is to essentially split it up into smaller sections, or just choose one specific section that contains the language that you want your students to practise. A 30-second snippet of video is often all that you require. And it’s much quicker to create too 🙂
Use the controls to position the start and end time for your resource. (Or just click on “Next” if you are happy to use the whole video.)
If you want to make a resource based on a transcript, on the next pane click on the slider at the top to “Enable transcript resource”. If you only want to make a Quiz based resource, leave the slider off and click on “Next” again (and scroll down to 4: Quiz below).
3.1: Transcript
To create a transcript-based resource, several steps are required. The first of these is to add a transcript of the video.
Here, the transcript should look the way you would want it to look if you were to print it out, taking into account paragraphs, line breaks etc. So if the text is a poem or song lyrics, set the text out on separate lines accordingly. Try to avoid having all of the text in one big block as this makes it harder for students to read and to follow.
If the YouTube content provider has already produced a transcript for their video, you can access this directly from the video’s YouTube page.
You can also click on the “automatic transcript” button on TeachVid to search for an automatically generated transcript (i.e. one that has been auto-generated by YouTube itself).
Or you can simply transcribe the video yourself.
3.2: Captions
At this stage, you will see that your text has been automatically broken down into numbered caption bubbles using line breaks.
If your text started off as a single paragraph (or a couple of paragraphs), this is the point at which you need to create the individual captions which form the basis of TeachVid’s interactive activities.
Clicking into the caption bubble (i.e. by clicking between the words) automatically splits each caption into two captions.
You can also join short lines of text into one caption (which you may want to do if, for example, your resource is based on song lyrics with only a few words per line) by clicking at the end of the first of the two captions that you wish to join.

The end result should be captions such as the ones shown in the image above.
Tips regarding captions, caption length, audio timings, etc:
- Aim for captions that are not too long. They shouldn’t ideally be much longer than the width of the white box (see image above) if you are creating a resource on a typical computer or laptop. Think about the fact that the caption needs to be displayed in the caption bar beneath the video during playback (and if the caption is very long, the font size will be tiny).
- Equally, try to avoid lots of single word captions (which you may find in dialogues with one word answers, for example). Consider the option of joining captions together where appropriate.
- Aim for captions that are fairly equal in length. This just makes the activities work better, but it isn’t a big deal if some captions are very short and others are much longer.
- Consider the total number of captions. Each TeachVid activity is broken down into mini-tasks based on the captions, as specified by you when you create your resource. Try to make it so that your resource has a reasonable number of these mini-tasks per activity. (Minimum of around 10? No more than 40 if you can avoid it.)
- Split according to audio. This is crucial. Your captions need to be clearly distinguishable from one another, so try to avoid placing your breaks between captions at points in the audio where the speaker is speaking very fast. Place your breaks where there is a natural pause in the audio, as far as possible.
3.3: Caption times
This is the last of the non-optional steps to complete if you want to make a transcript-based resource. Here you set the start and end times for each of the captions that you specified in the previous step.

The red arrows in the video progress bar represent the start and end times for each caption.
Use the “Hold to auto-advance” button to advance the video and to move the right arrow (the end time) to the right. Release it when it is roughly where you want it to be.
You can manually move the red arrows by clicking and dragging them.
You can also use the + and – buttons to change the start and end times backwards or forwards by one tenth of a second. The actual times are shown above these + and – buttons.
Use the arrows either side of the caption text to switch between captions.
Tips for caption times:
- Make your captions start just before (less than half a second before?) the words are actually spoken. It’s easy to omit to set the start time for the first caption, for example, with the result that the caption appears below the video for several seconds (or a minute or more in some cases) before the words are actually spoken. Drag the left arrow or use the + and – buttons to set the start time appropriately.
- Let the last caption run until the very end of the video. This seems to work best because it allows the video to finish playing completely in activity mode, rather than simply stopping where the last caption stops.
- Try to leave gaps between captions if you can. Sometimes this is not possible if captions are very close together. But if there are several seconds between the end of one utterance and the start of another, let the caption times reflect this.
3.4: Translations
Translations are optional. If you don’t want to include translations, simply leave the “Enable translations” slider switched off and click the Next button.
If you don’t include translations for your resource, however, there will be no parallel translation available to accompany any of the video activities, and of course there will be no ability to make comparisons between languages in learn mode.
You can use our Google Translate integration to automatically translate all of your captions into the translation language of your choice (which would normally be the L1 of your students).
As with anything from Google Translate, it isn’t 100% accurate, but it is a great starting point and a great time saver. You can make adjustments to the automatic translations yourself if you are not happy with them.
It’s a good idea to try to strike a balance between literal translation and well written L1. For song lyrics in particular, you may find it best to go for more literal translations, as things such as songs and poetry are notoriously hard to translate in a way that maintains their integrity.
Remember that the translations are there to provide students with (i) a point of comparison with the L2 when in learn mode and (ii) a reminder of the meaning of the L2 that they are trying to reconstruct when doing the activities.
3.5: Caption chunks
Chunks are an optional extra: not essential, but they add a lot to the learning experience.
Chunks and chunk translations (and chunk notes) are displayed over the video in learn mode when the student clicks into the L2 caption beneath the video. They are also used as the basis for the “Multi-choice” activity. (Where no chunks are specified, this activity uses whole captions instead.)
Chunks and chunk translations are also used as the basis for the “Mix-up” pdf printable.
(They will also be used at some stage in the future as the basis for vocabulary activities…)
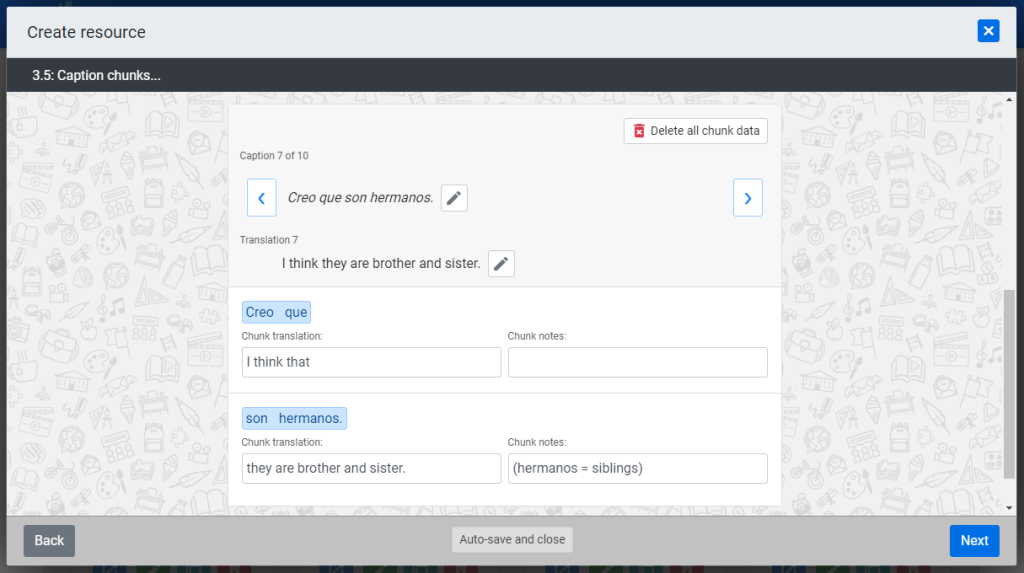
As with captions, chunks can be split and joined by clicking into them / at the end of them.
Once you have defined your chunks for each caption, you can add translations by selecting appropriately from the translation text and clicking to paste it into the correct chunk translation box.
(For example, in the above image, if you select “I think” from the translation text “I think they are brother and sister”, you will see a “click to paste” link appear above each chunk translation box. Simply click this to paste in the selected text. Note that you can add more to the chunk translations so that they are more correctly or more literally translated. e.g. in the image above the chunk translation for “Creo que” is “I think that” rather than just “I think”, because this explains the function of the word “que” in the sentence.)
Add chunk notes if you want to give students more information about a word or phrase. e.g. in the image the note “(hermanos = siblings)” has been added to make it clear to students that “son hermanos” does not literally translate as “they are brother and sister”.
4: Quiz
If you don’t want to add a multiple choice comprehension quiz to your resource, you can leave the slider switched off and click “Next” to go to the last stage and finalize your resource.

Use the +q (add a question) slider to choose a point in the video for your question, add the question text and up to 10 possible multiple choice answers.
You can add up to 20 questions per video.
5: Finalize
The last stage is to fill in a few details about your resource: title, subject, students’ language, description and access level.

Note that you can include hyperlinks in the description section (any text starting with http:// or https:// will be recognized as a link).
The access level determines whether or not the resource is shown in the public resource search and whether or not other TeachVid users can make a copy of your resource. The available access levels are:
- Public and copiable:
The resource shows in the resource search and may be copied by other teacher subscribers. (You need to be subscribed as a teacher to save a resource as public.) - Public, not copiable:
The resource shows in the resource search and but cannot be copied. (You need to be subscribed as a teacher to save a resource as public.) - Unlisted:
The resource does not show in the resource search but it can be shared via a URL. - Private:
The resource may only be accessed by the resource owner.
(Note that registered users who do not have a teacher subscription may create up to 5 unlisted or private resources. A Teacher subscription is required to create public resources. Teacher subscribers can create an unlimited number of resources.)
(Here’s a link to the resource shown above.)
“Auto-save and close”
Note that at any point you can click on the auto-save button to save a copy of the resource in its current state. You will then be able to return to it later simply by clicking on the “Edit” button that appears over the resource in your “My resources” tab.

Can I just put up a picture and not do a video as well?
LikeLike
It needs to be a YouTube video. Of course, your YouTube video can be simply an image with you doing a voiceover.
LikeLike
Can I choose the words I want for the gap fill exercise ? I’d like to focus on key words in the text rather than random words.
LikeLike
Not for the interactive activity, no. It’s always random, and it always ensures that there is at least one gap per caption. For the PDF printables, yes, you can customize the gap-fill and several other worksheets.
LikeLike
Can I copy another resource and edit it? (I found one I love but it has grammatical errors in the script.)
LikeLike
Yes, as long as it is saved as copiable. (Some aren’t…)
LikeLike